When coming up with my menu plan for the week of Passover, I knew I could rely on many of our dishes we have throughout the year, but I wanted to be a little more adventurous and make things that needed modification to be eaten during this time. Jewish Federation sends out a newspaper and this issue included an article with recipes for a vegetarian seder. A few of these dishes jumped out at me so I was excited to add them to the week's lineup.
I was having dinner guests over on Sunday so I set out to try my new-found recipe. This potato spinach gnocchi was pretty easy to make, though the rolling the dumpling part was a bit tedious. Everyone enjoyed it and went back for seconds, so I think it was a hit!
This recipe made about 100 tater tot sized dumplings so this can definitely feed a crowd. I made the tomato sauce included in the article, but you could serve this with any store bought or homemade sauce. The gnocchi are finished off with a sprinkle of parmesan and baked in the oven which I think adds a nice flavor and makes the texture a little less mushy. The dumplings stuck a bit to the baking sheet, but I plated the dumplings that side down so it still looked flawless (and gave my husband the opportunity to eat the leftover bits off the foil after our guests had left!). I saved the leftovers and am hoping it reheats well. I'll update once we eat the rest!
Potato Spinach Gnocchi (adapted from recipe by Marshall Weiss published in NJJN)
Ingredients
2lbs baking potatoes (which was 4 potatoes for me)
1 cup potato starch plus more as needed
1 egg, lightly beaten
2 tsp salt
10oz frozen chopped spinach, thawed
1 cup ricotta chese
1/2 tsp nutmeg
1/4 cup grated parmesan cheese
Directions
- Peel potatoes and boil in water for 15-30 min, until easily stabbed through with a fork.
- Preheat oven to 375 degrees F. Prepare a baking sheet by lightly oiling it (during Passover use cottonseed oil or Kosher for Passover olive oil).
- In a medium bowl, mash potatoes. Mix potato starch, egg, salt, spinach, ricotta, and nutmeg. If the dough is too sticky, add additional potato starch.
- Bring 4 qts of water to a boil.
- While water is heating, make the dumplings. With wet hands, form 1/2 tbsp of dough into a tater tot shape.
- Once the water is boiling, carefully drop the gnocchi into the water (one at a time so you don't splash boiling hot water onto yourself). They will rise to the surface when cooked, which only takes a few minutes.
- As the gnocchi rise to the top, remove them from the pot using a slotted spoon and place it onto the prepared baking sheet.
- Sprinkle the gnocchi with the grated parmesean and bake for 10-15 minutes.
Tomato Sauce for the Gnocchi
Ingredients
2 tbsp Kosher for Passover olive oil (or cottonseed oil)
1 small onion, chopped
3 cloves garlic, minced
1/4 cup parsley, chopped
1 bay leaf
28oz can crushed tomatoes
1 small can tomato paste
Directions
- Heat the oil in a medium pot. Add the onion and garlic and cook on low heat until translucent (approx 5 minutes)
- Add parsley, bay leaf, tomatoes, and tomato paste.
- Bring to a boil, then reduce heat and simmer for 20-30 minutes.
Showing posts with label Weekend meal. Show all posts
Tuesday, April 7, 2015
Tuesday, February 10, 2015
Hash Brown Quiche
I've said it before and I'll say it again - I love brunch. I want to invite people over at least once a month so I can enjoy the decadent dishes I can get away with making. In addition to my french toast, my go-to brunch dish is this hash brown quiche. It combines eggs and potatoes in one delicious bite. And (bonus!) after you pre-cook the hash brown crust, you bake the eggs at the same temperature as the french toast. I pop it in the oven 15 minutes after the french toast goes in, then I even have time for the quick clean up before my guests arrive!
I have mixed it up a little as well since I started making this. I've added mushrooms, switched out different kinds of cheese, etc. So you can add your own personal twist to cater to your family's tastebuds.
This dish is also toddler approved (though you may have to tell them it's "cheese" or else they won't eat it).
Hash Brown Quiche (slightly adapted from Paula Deen)
Ingredients
3 cups shredded hash brown (either freshly shredded potatoes or thawed from frozen)
4 tbsp (1/2 stick) melted butter
3 large eggs
1 cup half-and-half
1/4 cup diced scallions
1 cup shredded cheddar cheese
salt
pepper
Directions
- Preheat oven to 450 degrees, F
- In a colander, gently press potatoes with a paper towel to squeeze out excess water.
- In a greased 9in pie plate, toss potatoes with the melted butter until well combined. Then press the potato into the bottom and sides of the plate to form the crust.
- Bake for 20-25 minutes until it starts to turn golden brown and starting to crisp. When you remove it from the oven, lower the temperature to 350 degrees F.
- In a mixing bowl, whisk together the egg and half-and-half. Then stir in the scallions, cheese, and salt and pepper to taste.
- Once the potato crust is out of the oven, pour the egg mixture into the center of the crust. Use a spoon or spatula to spread out the cheese and scallions.
- Bake for 30-40 min (at 350) until the center is puffy and light golden brown.
I have mixed it up a little as well since I started making this. I've added mushrooms, switched out different kinds of cheese, etc. So you can add your own personal twist to cater to your family's tastebuds.
This dish is also toddler approved (though you may have to tell them it's "cheese" or else they won't eat it).
Hash Brown Quiche (slightly adapted from Paula Deen)
Ingredients
3 cups shredded hash brown (either freshly shredded potatoes or thawed from frozen)
4 tbsp (1/2 stick) melted butter
3 large eggs
1 cup half-and-half
1/4 cup diced scallions
1 cup shredded cheddar cheese
salt
pepper
Directions
- Preheat oven to 450 degrees, F
- In a colander, gently press potatoes with a paper towel to squeeze out excess water.
- In a greased 9in pie plate, toss potatoes with the melted butter until well combined. Then press the potato into the bottom and sides of the plate to form the crust.
- Bake for 20-25 minutes until it starts to turn golden brown and starting to crisp. When you remove it from the oven, lower the temperature to 350 degrees F.
- In a mixing bowl, whisk together the egg and half-and-half. Then stir in the scallions, cheese, and salt and pepper to taste.
- Once the potato crust is out of the oven, pour the egg mixture into the center of the crust. Use a spoon or spatula to spread out the cheese and scallions.
- Bake for 30-40 min (at 350) until the center is puffy and light golden brown.
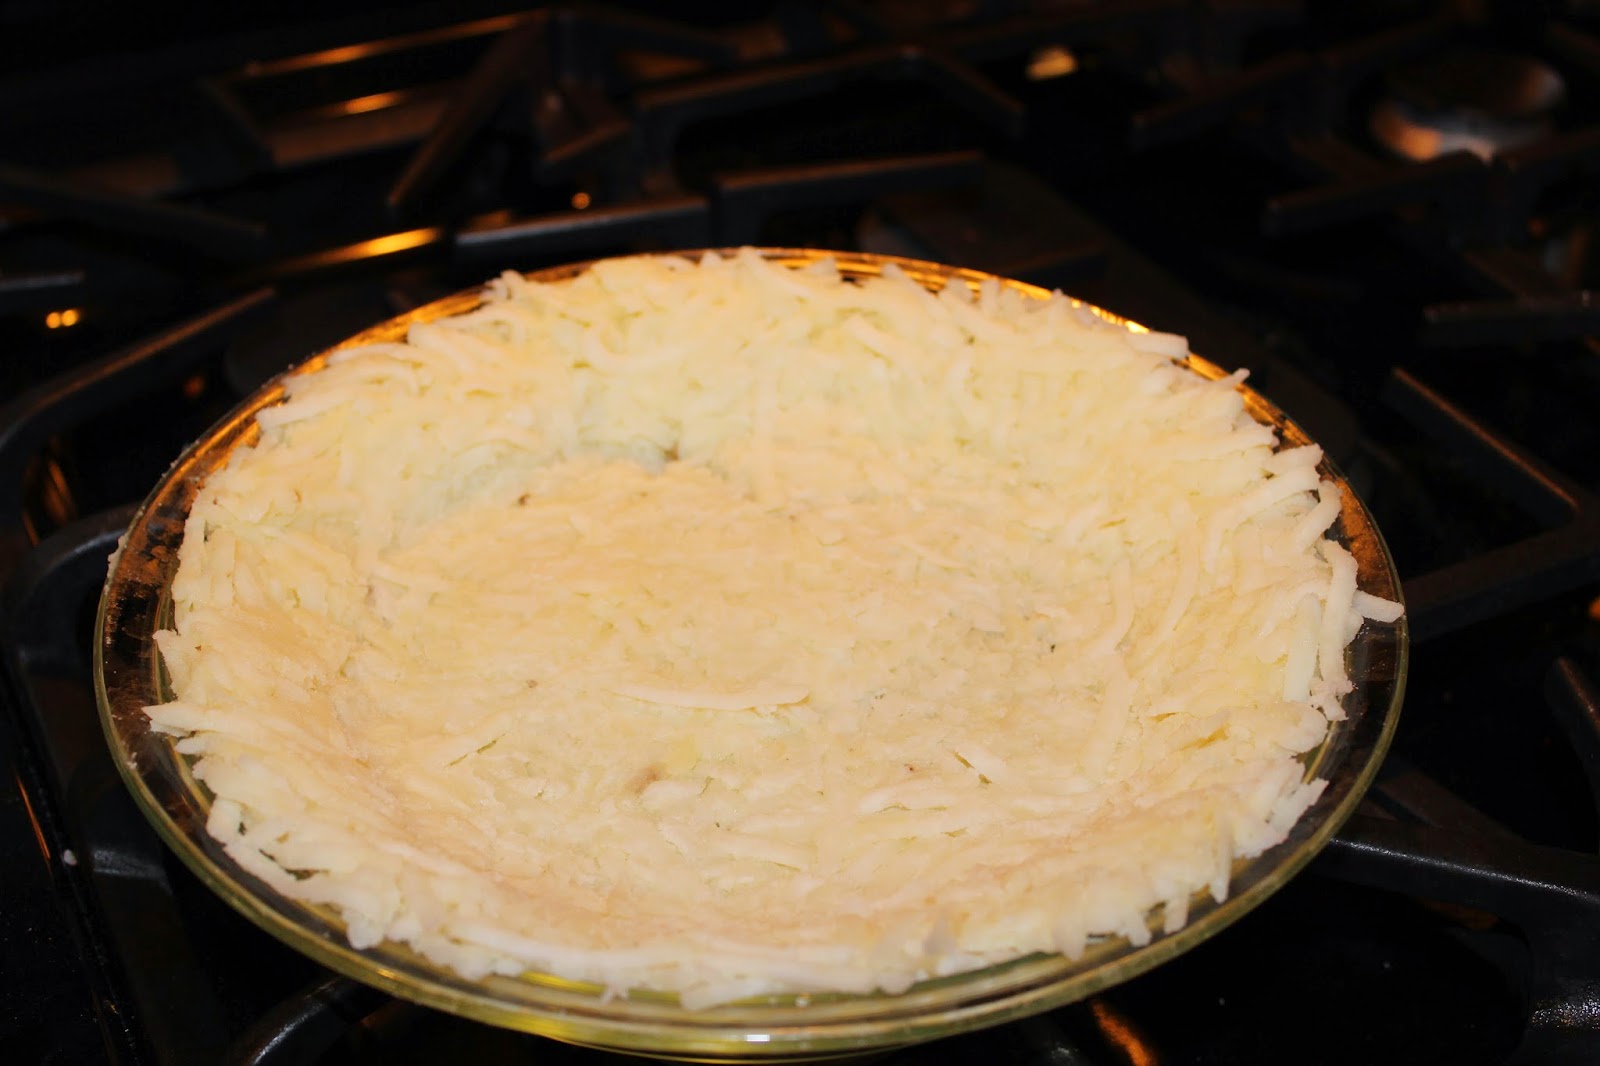
hash brown crust, ready for the oven
Wednesday, January 28, 2015
Split Pea soup
When the forecast for this week revealed a major snow storm, I knew immediately that I wanted to add soup to my menu. That's the proper way to spend a snow day, right?! Thankfully the storm wasn't as bad as predicted (we got 6 or so inches, not the predicted 2'+) but it was the perfect amount of snow to cause a snow day for my husband, we didn't have to worry about losing power, and we were able to get out and go sledding in the afternoon!
My husband's favorite soup is split pea. But he can't order it many places, as a lot of restaurants put ham in it. When I originally had the idea to make this soup for him a few months ago, I found this one from The Inventive Vegetarian, a site I've used before, so I trusted it would be good. I made one or two slight changes to make it more to my liking, but otherwise this was the perfect recipe! The soup itself is parve, though we added sourdough parmesan croutons which made this batch dairy once it was served.
I will advise to get the carrots, celery and parsley chopped first and put aside (they are added all at once so you can put them all together in a bowl) and not rinse the peas until just before putting them into the pot, as they will harden and become one big split pea clump if they have time to dry after rinsing.
This was a nice, cozy lunch that we ate while we looked out on the winter wonderland outside.
Split Pea Soup (slightly adapted from The Inventive Vegetarian)
Ingredients
1 large onion, chopped
2 tsp olive oil
3 small (or 2 medium/large) garlic cloves, diced
2 cups sliced carrots
2 cups sliced celery
1 lb (2.5 cups) dried green split peas, picked over and rinsed
8 cups vegetable stock
2 cups water
2 bay leaves
1 tbsp dried oregano
1 bunch parsley, rough chopped
salt & pepper to taste
croutons, for garnish (optional)
Directions
- Heat oil in a soup pot over medium heat. Add the onion to the hot oil and saute for a few minutes, until they begin to soften. Add garlic and saute for another minute.
- Add the carrots, celery, peas, herbs, stock, and water. Bring to a boil, then reduce to a simmer. Stirring occasionally, let it simmer for 90 minutes, partially covered.
- Salt & pepper to taste (keep in mind how salty the croutons you might be adding are). Remove the bay leaves.
- Using an immersion blender, blend the soup until well combined but still a little chunky.
- Ladle into bowls and garnish with croutons, if desired.
My husband's favorite soup is split pea. But he can't order it many places, as a lot of restaurants put ham in it. When I originally had the idea to make this soup for him a few months ago, I found this one from The Inventive Vegetarian, a site I've used before, so I trusted it would be good. I made one or two slight changes to make it more to my liking, but otherwise this was the perfect recipe! The soup itself is parve, though we added sourdough parmesan croutons which made this batch dairy once it was served.
I will advise to get the carrots, celery and parsley chopped first and put aside (they are added all at once so you can put them all together in a bowl) and not rinse the peas until just before putting them into the pot, as they will harden and become one big split pea clump if they have time to dry after rinsing.
This was a nice, cozy lunch that we ate while we looked out on the winter wonderland outside.
Split Pea Soup (slightly adapted from The Inventive Vegetarian)
Ingredients
1 large onion, chopped
2 tsp olive oil
3 small (or 2 medium/large) garlic cloves, diced
2 cups sliced carrots
2 cups sliced celery
1 lb (2.5 cups) dried green split peas, picked over and rinsed
8 cups vegetable stock
2 cups water
2 bay leaves
1 tbsp dried oregano
1 bunch parsley, rough chopped
salt & pepper to taste
croutons, for garnish (optional)
Directions
- Heat oil in a soup pot over medium heat. Add the onion to the hot oil and saute for a few minutes, until they begin to soften. Add garlic and saute for another minute.
- Add the carrots, celery, peas, herbs, stock, and water. Bring to a boil, then reduce to a simmer. Stirring occasionally, let it simmer for 90 minutes, partially covered.
- Salt & pepper to taste (keep in mind how salty the croutons you might be adding are). Remove the bay leaves.
- Using an immersion blender, blend the soup until well combined but still a little chunky.
- Ladle into bowls and garnish with croutons, if desired.
Monday, September 29, 2014
Butternut Squash Risotto
I posted the other day about roasted beet and goat cheese risotto. Before I ever tried that out I made short-cut risotto using my slow cooker. I admit that I started a blog post about it at the time, but hadn't finished writing it. I revisited the incomplete post, reminding myself how delicious the end result was. Now that squash season is coming back I look forward to making this again!
In an effort to cut down on cooking in the evenings, I try to maximize the use of my slow cooker. But I usually ended up doing the same recipe over and over. When I started hearing buzz about the new cookbook Slow Cooker Revolution Volume 2 by America's Test Kitchen I knew it was something I needed to add to my collection. I don't have Volume 1, but from what I've heard there is a LOT of prep work that goes into the recipes in there. Volume 2 focuses on things with easy prep. This doesn't usually mean just chopping veggies and opening cans which is what I was used to doing. While the prep work is still pretty simple, you utilize the microwave and other shortcuts to making a great dish in the slow cooker both before and sometimes after the cook time is up.
Among the recipes that jumped out at me was Butternut Squash Risotto. I like everything in that title, but I had never made risotto before because it usually was done by standing over a stove for a long time. This recipe avoids that by microwaving the rice before cooking and adding hot broth to it from the start. I will say, though, that this is not the dish to make on a day you are putting on the slow cooker and going off to work. It only cooks 2-3 hours and I even if you have a timer I don't know how long it can be on 'keep warm' before it affects the outcome.
Of course I thought I had totally screwed up the whole thing because I hadn't read the blurb at the top of the page where it said to avoid the pre-cut chunks of squash and instead get a whole one or a halved & peeled one. My supermarket doesn't sell halved ones and I'm sorry, but I have no patience when it comes to peeling a butternut squash. I have other things I'd rather be doing (just about anything I can think of...). I cut the pre-cut chunks down to 1/2 inch pieces and I think that it came out just fine.
And the official verdict on this is that it just might be my husbands #2 favorite dish I've made (after my poached flounder). He would have to go back through everything I've ever made to decide if anything else was actually his second favorite, but this is definitely the best dish I've made in recent history.
Butternut Squash Risotto (from America Test Kitchen's Slow Cooker Revolution Vol 2)
Ingredients
6 cups vegetable broth
2 cups Arborio rice
1 cup chopped onion
3 tbsp unsalted butter
1/2 cup dry white wine
2 lbs peeled and seeded butternut squash, cut into 1/2 inch slices (***while they like pre-cut & peeled squash, they recommend avoiding the pre-cut chunks which they find dry and stringy)
salt
pepper
1 cup frozen peas
1 cup grated Parmesan cheese
1 tbsp minced fresh sage
Directions
- microwave 4 cups broth in bowl until steaming, about 5 minutes.
- in a separate bowl, microwave rice, onion, and 1 tbsp butter, stirring occasionally, until ends of rice kernels are transparent, about 5 minutes.
- transfer rice to the slow cooker and immediately stir in wine, and let sit until wine is almost completely absorbed, about 2 minutes.
- stir in hot broth, squash, and 1/2 tsp salt. Cover and cook until rice is tender, 2 to 3 hours on high.
- after the cook time is up, microwave remaining 2 cups broth in bowl until steaming, about 2 minutes.
- slowly stream hot broth into rice, stirring gently, until liquid is absorbed and risotto is creamy, about 1 minute.
- gently stir in peas and let sit until heated through, about 5 minutes.
- stir in Parmesan, sage, and remaining 2 tbsp butter (adjust risotto consistency with extra hot broth as needed).
- season with salt and pepper to taste, and serve.
In an effort to cut down on cooking in the evenings, I try to maximize the use of my slow cooker. But I usually ended up doing the same recipe over and over. When I started hearing buzz about the new cookbook Slow Cooker Revolution Volume 2 by America's Test Kitchen I knew it was something I needed to add to my collection. I don't have Volume 1, but from what I've heard there is a LOT of prep work that goes into the recipes in there. Volume 2 focuses on things with easy prep. This doesn't usually mean just chopping veggies and opening cans which is what I was used to doing. While the prep work is still pretty simple, you utilize the microwave and other shortcuts to making a great dish in the slow cooker both before and sometimes after the cook time is up.
Among the recipes that jumped out at me was Butternut Squash Risotto. I like everything in that title, but I had never made risotto before because it usually was done by standing over a stove for a long time. This recipe avoids that by microwaving the rice before cooking and adding hot broth to it from the start. I will say, though, that this is not the dish to make on a day you are putting on the slow cooker and going off to work. It only cooks 2-3 hours and I even if you have a timer I don't know how long it can be on 'keep warm' before it affects the outcome.
Of course I thought I had totally screwed up the whole thing because I hadn't read the blurb at the top of the page where it said to avoid the pre-cut chunks of squash and instead get a whole one or a halved & peeled one. My supermarket doesn't sell halved ones and I'm sorry, but I have no patience when it comes to peeling a butternut squash. I have other things I'd rather be doing (just about anything I can think of...). I cut the pre-cut chunks down to 1/2 inch pieces and I think that it came out just fine.
And the official verdict on this is that it just might be my husbands #2 favorite dish I've made (after my poached flounder). He would have to go back through everything I've ever made to decide if anything else was actually his second favorite, but this is definitely the best dish I've made in recent history.
Butternut Squash Risotto (from America Test Kitchen's Slow Cooker Revolution Vol 2)
Ingredients
6 cups vegetable broth
2 cups Arborio rice
1 cup chopped onion
3 tbsp unsalted butter
1/2 cup dry white wine
2 lbs peeled and seeded butternut squash, cut into 1/2 inch slices (***while they like pre-cut & peeled squash, they recommend avoiding the pre-cut chunks which they find dry and stringy)
salt
pepper
1 cup frozen peas
1 cup grated Parmesan cheese
1 tbsp minced fresh sage
Directions
- microwave 4 cups broth in bowl until steaming, about 5 minutes.
- in a separate bowl, microwave rice, onion, and 1 tbsp butter, stirring occasionally, until ends of rice kernels are transparent, about 5 minutes.
- transfer rice to the slow cooker and immediately stir in wine, and let sit until wine is almost completely absorbed, about 2 minutes.
- stir in hot broth, squash, and 1/2 tsp salt. Cover and cook until rice is tender, 2 to 3 hours on high.
- after the cook time is up, microwave remaining 2 cups broth in bowl until steaming, about 2 minutes.
- slowly stream hot broth into rice, stirring gently, until liquid is absorbed and risotto is creamy, about 1 minute.
- gently stir in peas and let sit until heated through, about 5 minutes.
- stir in Parmesan, sage, and remaining 2 tbsp butter (adjust risotto consistency with extra hot broth as needed).
- season with salt and pepper to taste, and serve.
Monday, September 22, 2014
Beet and Goat Cheese Risotto
I think I've mentioned before that I am on a cooking message board. Each day those of us who have blogs post links and pictures to that day's blog posts. Back in February 2012 Jill from JBeanCuisine posted a picture of her roasted beet risotto with goat cheese that was just gorgeous. I bookmarked the page because of the picture but having never eaten beets it wasn't on the top of my list of things to make.
Then I joined a CSA this year and in our box we started getting beets. My mind immediately went to that beautiful picture and I knew what I would do with the beets. Plus. risotto has always been one of those recipes that I know is time consuming and hard to make but I still wanted to try at some point.
The first time beets were in the box they were golden beets, so they didn't give us that nice pinkish color, but were still super tasty. Since then we have gotten red beets so I had to go back and make the risotto again!
The risotto is actually pretty easy to make, but it does require your attention. I like to pour myself a glass of wine, pull a stool up to the stove and sip away as I stir in the broth.
One note when using red beets - the color will stain! I use prep gloves (the same kind I use when touching raw meats) when handling them plus I use foil under them on the cutting board so I don't end up with a bright pink board. I also rinse the knife immediately after use so it doesn't stain.
Roasted Beet Risotto with Goat Cheese (from JBeanCuisine)
Ingredients
4 medium beets, trimmed (leaving 1 inch of stems attached)
3 1/2 cups vegetable stock + 1tbsp for roasting beets
3 cups water
1 small onion, finely chopped
2 tbsp olive oil + 1 tbsp for roasting beets
1/2 cup dry white wine
2 cups Arborio rice
1 tsp salt
1/2 tsp freshly ground black pepper
1/2 cup goat cheese (plus more for garnish)
Directions
- preheat oven to 425'
- toss the beets with 1 tbsp olive oil, 1 tbsp stock and a dash of salt & pepper. Tightly wrap beets in double layer of foil and roast on a baking sheet until very tender (about 1 - 1.5 hours depending on the size of the beets). You will now they are ready when you can insert a knife through the middle without any resistance.
- Place the cooked beets aside (with the foil opened to allow steam to escape) to cool for about 20 minutes
- When the beets are cool enough to handle, peel them, discarding stems and root ends, then cut into 1/2 in cubes.
- When you are ready to make the risotto, bring the broth and water to a rolling simmer in a medium saucepan. Reduce heat and keep at a low simmer
- Preheat a wife (4-6 qt) pot over medium/medium-high heat. Add in the olive oil and onions and cook, stirring occasionally, until softened. About 3 minutes.
- Add rice to the onions and oil and cook, stirring constantly, for about 2 minutes
- Add the wine to the pan, simmer briskly, stirring constantly, until all of the liquid is absorbed, about 1 minute
- Add in 1/2 cup broth and simmer briskly, stirring constantly, until broth is absorbed. Continue simmering and adding broth (about 1/2 cup at a time), stirring constantly and letting each addition be absorbed before adding the next, until the rice is just tender and creamy-looking, 18 to 22 minutes (reserve leftover broth).
- Stir in diced beets, salt, and pepper (mixture will turn bright pink) and cook, stirring, until heated through.
- thin to your liking with some of the leftover broth, then stir in cheese and remove from heat.
- serve, garnishing with additional goat cheese if desired
Then I joined a CSA this year and in our box we started getting beets. My mind immediately went to that beautiful picture and I knew what I would do with the beets. Plus. risotto has always been one of those recipes that I know is time consuming and hard to make but I still wanted to try at some point.
The first time beets were in the box they were golden beets, so they didn't give us that nice pinkish color, but were still super tasty. Since then we have gotten red beets so I had to go back and make the risotto again!
The risotto is actually pretty easy to make, but it does require your attention. I like to pour myself a glass of wine, pull a stool up to the stove and sip away as I stir in the broth.
One note when using red beets - the color will stain! I use prep gloves (the same kind I use when touching raw meats) when handling them plus I use foil under them on the cutting board so I don't end up with a bright pink board. I also rinse the knife immediately after use so it doesn't stain.
Roasted Beet Risotto with Goat Cheese (from JBeanCuisine)
Ingredients
4 medium beets, trimmed (leaving 1 inch of stems attached)
3 1/2 cups vegetable stock + 1tbsp for roasting beets
3 cups water
1 small onion, finely chopped
2 tbsp olive oil + 1 tbsp for roasting beets
1/2 cup dry white wine
2 cups Arborio rice
1 tsp salt
1/2 tsp freshly ground black pepper
1/2 cup goat cheese (plus more for garnish)
Directions
- preheat oven to 425'
- toss the beets with 1 tbsp olive oil, 1 tbsp stock and a dash of salt & pepper. Tightly wrap beets in double layer of foil and roast on a baking sheet until very tender (about 1 - 1.5 hours depending on the size of the beets). You will now they are ready when you can insert a knife through the middle without any resistance.
- Place the cooked beets aside (with the foil opened to allow steam to escape) to cool for about 20 minutes
- When the beets are cool enough to handle, peel them, discarding stems and root ends, then cut into 1/2 in cubes.
- When you are ready to make the risotto, bring the broth and water to a rolling simmer in a medium saucepan. Reduce heat and keep at a low simmer
- Preheat a wife (4-6 qt) pot over medium/medium-high heat. Add in the olive oil and onions and cook, stirring occasionally, until softened. About 3 minutes.
- Add rice to the onions and oil and cook, stirring constantly, for about 2 minutes
- Add the wine to the pan, simmer briskly, stirring constantly, until all of the liquid is absorbed, about 1 minute
- Add in 1/2 cup broth and simmer briskly, stirring constantly, until broth is absorbed. Continue simmering and adding broth (about 1/2 cup at a time), stirring constantly and letting each addition be absorbed before adding the next, until the rice is just tender and creamy-looking, 18 to 22 minutes (reserve leftover broth).
- Stir in diced beets, salt, and pepper (mixture will turn bright pink) and cook, stirring, until heated through.
- thin to your liking with some of the leftover broth, then stir in cheese and remove from heat.
- serve, garnishing with additional goat cheese if desired
Monday, November 11, 2013
Butternut Squash Lasagna
When most people think of fall flavors the #1 thing that probably comes to mind for most people is pumpkin. I'm pretty sure 99% of my newsfeed on Facebook was dedicated to the arrival of the pumpkin spice latte at Starbucks on the day they made their return appearance. However, when I think of fall I immediately think of butternut squash. I seriously can't believe that before 2011 I don't think I had even tasted it. I now want to put it in everything! My butternut squash soup made an appearance on our table a few weeks ago. But I'm always looking for different things to do with it.
So I was incredibly excited when I flipped through this month's issue of Food Network Magazine and in their weekend meal section featuring different lasagnas they included a recipe for one using roasted butternut squash. I basically started salivating as soon as I read the title of the recipe. I knew that I had to make it in the near future.
I was able to get this done on a Sunday night, when my husband was home to help with the baby. Though I will say, although this recipe straightforward probably does take the 2 hours listed, it's easy to do some of the parts earlier than others. For example, I put the squash and onions to roast and then went to feed the baby. When I returned to the kitchen maybe 30 min later (my husband was on oven duty and had taken the pans out when they finished cooking) I then did the sauce. I like when a more time consuming recipe doesn't leave time constraints. Much easier to handle making a dish like this while I can't give it my undivided attention.
Although I typed out the recipe below as printed in the magazine, I adjusted the recipe slightly to suit our tastes:
- I used a red onion instead of a basic "cooking onion" as I usually do. Roasted red onions may be another new favorite of time
- I didn't use sage leaves just a sprinkle of dried sage. While I'm not the biggest sage fan my husband absolutely hates it and wouldn't touch a dish with sage leaves
- I used skim milk instead of whole
- I changed the size of the pan and made 2 pans. Since there are only two of us and I'm heading back to work in a few weeks I want to start stocking up the freezer. One pan was plenty for dinner 2 nights and now we have some in the freezer to enjoy later.
This came out so delicious, I am sure it will make a return to my fall menu next year!
Butternut Squash Lasagna (from Food Network Magazine)
Ingredients
for the vegetables:
1 butternut squash, peeled and cut into 1/2 inch cubes
2 tbsp extra virgin olive oil
kosher salt
1 onion, halved and sliced
for the bechamel:
2 tbsp unsalted butter
10 sage leaves
1 1/4 cup all-purpose flour
4 cups whole milk
pinch of freshly ground nutmeg
for the lasagna:
unsalted butter, for the baking dish
1 cup grated fontina cheese (about 4 oz)
1 cup grated low-moisture mozzarella cheese (about 4 oz)
1 cup grated Parmesan cheese (about 4 oz)
1 tbsp all-purpose flour
9 no-boil lasagna noodles
Directions
- Make the vegetables: Preheat the oven to 425 degrees. Toss the squash with 1 tbsp olive oil on a baking sheet; season with salt. Toss the onion with the remaining 1 tbsp olive oil on a separate baking sheet; season with salt. Roast, rotating the baking sheets once, until the vegetables are tender, 18-20 minutes; set aside. Reduce the oven temperature to 350.
- Meanwhile, make the bechamel: Melt the butter in a medium saucepan over medium heat. Add the sage and cook 1 minute. Whisk in the flour until smooth, cook, whisking, until the flour is lightly golden but not brown, about 2 minutes. Gradually whisk in the milk until smooth. Bring to a boil, then reduce the heat to medium low and simmer, stirring occasionally, until thickened, about 5 minutes. Stir in the nutmeg.
- Assemble the lasagna: Butter a 9x13 inch baking dish. Toss the cheeses and the flour in a bowl; set aside 1/2 cup for topping. Evenly coat the bottom of the dish with 1/2 cup of the bechamel. Lay 2 noodles side by side on top. Cover with one third of the remaining bechamel. Sprinkle with half o the remaining cheese mixture, then top with half of the vegetable mixture. Arrange 3 more noodles on top and repeat the layers (bechamel, cheese, vegetables). Top with the remaining 3 noodles, then cover with the remaining bechamel; sprinkle with the reserved 1/2 cup cheese.
- Loosely cover the dish with foil and bake until bubbly, about 45 minutes. Turn on the broiler. Uncover the lasagna and broil until browned, about 2 minutes. Let stand 15 minutes before serving.
So I was incredibly excited when I flipped through this month's issue of Food Network Magazine and in their weekend meal section featuring different lasagnas they included a recipe for one using roasted butternut squash. I basically started salivating as soon as I read the title of the recipe. I knew that I had to make it in the near future.
I was able to get this done on a Sunday night, when my husband was home to help with the baby. Though I will say, although this recipe straightforward probably does take the 2 hours listed, it's easy to do some of the parts earlier than others. For example, I put the squash and onions to roast and then went to feed the baby. When I returned to the kitchen maybe 30 min later (my husband was on oven duty and had taken the pans out when they finished cooking) I then did the sauce. I like when a more time consuming recipe doesn't leave time constraints. Much easier to handle making a dish like this while I can't give it my undivided attention.
Although I typed out the recipe below as printed in the magazine, I adjusted the recipe slightly to suit our tastes:
- I used a red onion instead of a basic "cooking onion" as I usually do. Roasted red onions may be another new favorite of time
- I didn't use sage leaves just a sprinkle of dried sage. While I'm not the biggest sage fan my husband absolutely hates it and wouldn't touch a dish with sage leaves
- I used skim milk instead of whole
- I changed the size of the pan and made 2 pans. Since there are only two of us and I'm heading back to work in a few weeks I want to start stocking up the freezer. One pan was plenty for dinner 2 nights and now we have some in the freezer to enjoy later.
This came out so delicious, I am sure it will make a return to my fall menu next year!
Butternut Squash Lasagna (from Food Network Magazine)
Ingredients
for the vegetables:
1 butternut squash, peeled and cut into 1/2 inch cubes
2 tbsp extra virgin olive oil
kosher salt
1 onion, halved and sliced
for the bechamel:
2 tbsp unsalted butter
10 sage leaves
1 1/4 cup all-purpose flour
4 cups whole milk
pinch of freshly ground nutmeg
for the lasagna:
unsalted butter, for the baking dish
1 cup grated fontina cheese (about 4 oz)
1 cup grated low-moisture mozzarella cheese (about 4 oz)
1 cup grated Parmesan cheese (about 4 oz)
1 tbsp all-purpose flour
9 no-boil lasagna noodles
Directions
- Make the vegetables: Preheat the oven to 425 degrees. Toss the squash with 1 tbsp olive oil on a baking sheet; season with salt. Toss the onion with the remaining 1 tbsp olive oil on a separate baking sheet; season with salt. Roast, rotating the baking sheets once, until the vegetables are tender, 18-20 minutes; set aside. Reduce the oven temperature to 350.
- Meanwhile, make the bechamel: Melt the butter in a medium saucepan over medium heat. Add the sage and cook 1 minute. Whisk in the flour until smooth, cook, whisking, until the flour is lightly golden but not brown, about 2 minutes. Gradually whisk in the milk until smooth. Bring to a boil, then reduce the heat to medium low and simmer, stirring occasionally, until thickened, about 5 minutes. Stir in the nutmeg.
- Assemble the lasagna: Butter a 9x13 inch baking dish. Toss the cheeses and the flour in a bowl; set aside 1/2 cup for topping. Evenly coat the bottom of the dish with 1/2 cup of the bechamel. Lay 2 noodles side by side on top. Cover with one third of the remaining bechamel. Sprinkle with half o the remaining cheese mixture, then top with half of the vegetable mixture. Arrange 3 more noodles on top and repeat the layers (bechamel, cheese, vegetables). Top with the remaining 3 noodles, then cover with the remaining bechamel; sprinkle with the reserved 1/2 cup cheese.
- Loosely cover the dish with foil and bake until bubbly, about 45 minutes. Turn on the broiler. Uncover the lasagna and broil until browned, about 2 minutes. Let stand 15 minutes before serving.
Thursday, February 21, 2013
Eggplant Parmigiana
If it were up to me, I would eat cheese for every meal. Seriously, my husband says that it explains why I'm so cheesy (insert rim shot sound here). When the latest issue of Food Network Magazine showed up in my mail box with the big headline announcing it's "the cheese issue", I immediately curled up on the couch and read it cover to cover. Unfortunately due to the mixing of meat and dairy, about 60% of the recipes are not able to be made in my home (others can be amended, but for many it would totally change the dish). When I came across the recipe for eggplant parm, I knew I wanted to try it out. Then my husband saw it over my shoulder and immediately asked if we could make it.
The one thing about this dish is, it takes a long time to make. The printed recipe says it takes 2h 45min, but it took me just a little longer (about 3 hours). I did make one switch in the order of things. As printed, it said to make the sauce, then prep the eggplant (which then sits for an hour). I did the eggplant first, then made the sauce, which made a lot more sense. I even had a little down time after the sauce was done to eat a salad (I had started cooking a little later than I meant to, so we needed the salad to tide us over until the main course was ready!). I think I can shave a little time off the prep time the next time I make this, everything is always a little clunky the first time you make it!
This recipe was fun to make, especially because it was easy for 2 people to do together. After the eggplant was ready to be fried, my husband took care of that while I grated the cheese and got everything to put the whole thing together.
A few things I'd do differently next time - the eggplant we got was most bulbous on the bottom so the slices ended up varying in size, next time I'd get one that was a little more symmetrical so the slices come out more uniform. Also, the package of mozzarella slices I bought was only 8oz which I didn't realize at the time, so it wasn't quite as cheesy (and I bought regular mozzarella, not fresh, so I'd buy fresh next time and slice it myself). On the third layer of eggplant I didn't end up using the mozzarella so that I could use the final slices on top.
It definitely lived up to any expectations we had. And it says it serves 6, which is just about right (it would have been 6 full servings had my husband not eaten 2 slices the first night, so technically it served 5).
Eggplant Parmigiana (recipe by Alex Guarnaschelli)
Ingredients
for the sauce:
2 tbsp extra virgin olive oil
2 small onions, halved and thinly sliced
3 cloves garlic, grated
kosher salt
1 1/2 tsp red pepper flakes
1 1/2 tsp sugar
1 28oz can plus one 15oz can whole San Marzano plum tomatoes
for the eggplant:
1 medium eggplant (about 1 1/4lbs) sliced into 1/2-inch thick rounds
kosher salt
1/4 cup all purpose flour
freshly ground pepper
3 large eggs
1 1/2 tbsp milk
2 cups Italian-style breadcrumbs
1 1/2 tsp dried oregano
1 1/2 tsp fresh thyme leaves
1 1/2 to 2 cups vegetable oil for frying
12 oz fresh mozzarella cheese, thinly sliced
1/4 cup grated parmesan cheese (about 1 oz)
2 cups grated provolone cheese (about 8oz)
handful of fresh basil leaves, torn
Directions
- Prepare the eggplant: Put the eggplant rounds in a single layer on a baking sheet. Sprinkle with salt on both sides and let sit, about 1 hour.
- Make the sauce: Heat the olive oil in a large skillet over medium-high heat. Add the onions and garlic and season with salt and the red pepper flakes; cook until the onions are soft and translucent (7 to 8 minutes). Add the sugar and tomatoes and break up some of the tomatoes with a wooden spoon. Reduce the heat to medium and cook, stirring from time to time, until the tomatoes are fairly borken down (10 to 15 minutes). Taste for seasoning. Let cool.
- Rinse the eggplant with cold water and dry thoroughly with a kitchen towel.
- Put the flour in a medium bowl and season with salt and pepper. In another bowl, whisk the eggs with the milk and season with salt and pepper. In a third bowl, combine the breadcrumbs, oregegano, and thyme and season with salt and pepper. Dredge each eggplant slice in the flour and shake off any excess. Dip in the egg mixture and finally in the breadcrumbs, coating both sides. Lay the eggplant slices on baking sheets in a single layer.
- Heat about 1/2 inch vegetable oil in a large skillet over medium-high heat until it begins to smoke lightly (between 380 and 400 degrees). Using tongs, add a single layer of eggplant to the skillet and cook until golden brown, about 2 minutes per side. Transfer to a paper towel-lined baking sheet and season lightly with salt. Repeat until all of the eggplant is fried.
- Position a rack in the upper third of the oven and preheat to 350. Spoon about one-quarter of the tomato sauce into a 9-by-13-inch baking dish. Top with a layer of the fried eggplant, overlapping the slices slightly. Top with one-quarter of the mozzarella, then sprinkle with about one-third each of the parmesan, provolone, and basil. Repeat the layering 2 more times (sauce, eggplant, cheese, basil), then finish with the remaining sauce and mozzarella. Press the layers firmly into the dish. Bake until the cheese is melted and bubbly (30 to 40 min). For an extra-brown top, put the dish under the broiler for a minute or two just before serving.
The one thing about this dish is, it takes a long time to make. The printed recipe says it takes 2h 45min, but it took me just a little longer (about 3 hours). I did make one switch in the order of things. As printed, it said to make the sauce, then prep the eggplant (which then sits for an hour). I did the eggplant first, then made the sauce, which made a lot more sense. I even had a little down time after the sauce was done to eat a salad (I had started cooking a little later than I meant to, so we needed the salad to tide us over until the main course was ready!). I think I can shave a little time off the prep time the next time I make this, everything is always a little clunky the first time you make it!
This recipe was fun to make, especially because it was easy for 2 people to do together. After the eggplant was ready to be fried, my husband took care of that while I grated the cheese and got everything to put the whole thing together.
A few things I'd do differently next time - the eggplant we got was most bulbous on the bottom so the slices ended up varying in size, next time I'd get one that was a little more symmetrical so the slices come out more uniform. Also, the package of mozzarella slices I bought was only 8oz which I didn't realize at the time, so it wasn't quite as cheesy (and I bought regular mozzarella, not fresh, so I'd buy fresh next time and slice it myself). On the third layer of eggplant I didn't end up using the mozzarella so that I could use the final slices on top.
It definitely lived up to any expectations we had. And it says it serves 6, which is just about right (it would have been 6 full servings had my husband not eaten 2 slices the first night, so technically it served 5).
Eggplant Parmigiana (recipe by Alex Guarnaschelli)
Ingredients
for the sauce:
2 tbsp extra virgin olive oil
2 small onions, halved and thinly sliced
3 cloves garlic, grated
kosher salt
1 1/2 tsp red pepper flakes
1 1/2 tsp sugar
1 28oz can plus one 15oz can whole San Marzano plum tomatoes
for the eggplant:
1 medium eggplant (about 1 1/4lbs) sliced into 1/2-inch thick rounds
kosher salt
1/4 cup all purpose flour
freshly ground pepper
3 large eggs
1 1/2 tbsp milk
2 cups Italian-style breadcrumbs
1 1/2 tsp dried oregano
1 1/2 tsp fresh thyme leaves
1 1/2 to 2 cups vegetable oil for frying
12 oz fresh mozzarella cheese, thinly sliced
1/4 cup grated parmesan cheese (about 1 oz)
2 cups grated provolone cheese (about 8oz)
handful of fresh basil leaves, torn
Directions
- Prepare the eggplant: Put the eggplant rounds in a single layer on a baking sheet. Sprinkle with salt on both sides and let sit, about 1 hour.
- Make the sauce: Heat the olive oil in a large skillet over medium-high heat. Add the onions and garlic and season with salt and the red pepper flakes; cook until the onions are soft and translucent (7 to 8 minutes). Add the sugar and tomatoes and break up some of the tomatoes with a wooden spoon. Reduce the heat to medium and cook, stirring from time to time, until the tomatoes are fairly borken down (10 to 15 minutes). Taste for seasoning. Let cool.
- Rinse the eggplant with cold water and dry thoroughly with a kitchen towel.
- Put the flour in a medium bowl and season with salt and pepper. In another bowl, whisk the eggs with the milk and season with salt and pepper. In a third bowl, combine the breadcrumbs, oregegano, and thyme and season with salt and pepper. Dredge each eggplant slice in the flour and shake off any excess. Dip in the egg mixture and finally in the breadcrumbs, coating both sides. Lay the eggplant slices on baking sheets in a single layer.
- Heat about 1/2 inch vegetable oil in a large skillet over medium-high heat until it begins to smoke lightly (between 380 and 400 degrees). Using tongs, add a single layer of eggplant to the skillet and cook until golden brown, about 2 minutes per side. Transfer to a paper towel-lined baking sheet and season lightly with salt. Repeat until all of the eggplant is fried.
- Position a rack in the upper third of the oven and preheat to 350. Spoon about one-quarter of the tomato sauce into a 9-by-13-inch baking dish. Top with a layer of the fried eggplant, overlapping the slices slightly. Top with one-quarter of the mozzarella, then sprinkle with about one-third each of the parmesan, provolone, and basil. Repeat the layering 2 more times (sauce, eggplant, cheese, basil), then finish with the remaining sauce and mozzarella. Press the layers firmly into the dish. Bake until the cheese is melted and bubbly (30 to 40 min). For an extra-brown top, put the dish under the broiler for a minute or two just before serving.
Monday, December 31, 2012
Brisket and Non-Dairy Cornbread
One of my best friends and I get together every other week or so for lunch since we work a few blocks from each other, but we try to get together with our husbands as well every month or so. It's nice because while she and I are sorority sisters who have known each other for 10 years now, we've become friends with each other's husband and the two guys have become friends as well. To a point where our husbands argue that we're their friends. Anyway, we had the two of them over for dinner the other night. I knew when we invited them that my meal would have to be either meat or parve since my friend is allergic to dairy. Fine with me, that meant I could break out my nice china for the meal! But what to make?
A few weeks ago, during Hurricane Sandy, my husband and I were at one of my other best friend's home to recharge our phones, check work e-mails and generally just warm up while we had no power. My friend invited us to stay for dinner, and from the yummy aroma in the air, we couldn't resist accepting the invitation. She served the most delectable brisket. Of course I had to ask her for the recipe! This was the perfect thing for our dinner party.
Thankfully I was planning on being home for most of the day of this dinner. The brisket cooks low and slow - 250 degrees for 7 hours. For sides I made a dairy-free cornbread, roasted potatoes and steamed greenbeans. It actually lead to a pretty relaxing day. I made the cornbread in the morning, put the brisket it, put the potatoes in the oven when the brisket came out to rest and then steamed the beans. I served a black bean hummus when they first arrived and then a salad. Dessert was a zucchini bread, which I will blog about later this week. All in all, I think it was a pretty successful dinner party!
Brisket (very slightly adapted from Food.com)
Ingredients
A few weeks ago, during Hurricane Sandy, my husband and I were at one of my other best friend's home to recharge our phones, check work e-mails and generally just warm up while we had no power. My friend invited us to stay for dinner, and from the yummy aroma in the air, we couldn't resist accepting the invitation. She served the most delectable brisket. Of course I had to ask her for the recipe! This was the perfect thing for our dinner party.
Thankfully I was planning on being home for most of the day of this dinner. The brisket cooks low and slow - 250 degrees for 7 hours. For sides I made a dairy-free cornbread, roasted potatoes and steamed greenbeans. It actually lead to a pretty relaxing day. I made the cornbread in the morning, put the brisket it, put the potatoes in the oven when the brisket came out to rest and then steamed the beans. I served a black bean hummus when they first arrived and then a salad. Dessert was a zucchini bread, which I will blog about later this week. All in all, I think it was a pretty successful dinner party!
Brisket (very slightly adapted from Food.com)
Ingredients
1 beef brisket (estimate 1/2 lb per person)
garlic salt
onion salt
celery salt
3 ounces liquid smoke
Worcestershire sauce
1 bottle barbecue sauce
Directions
- Trim fat from brisket.
- Sprinkle meat liberally with all the salts.
- Line a baking pan with enough foil to seal over the meat.
- Put meat on foil lined pan and pour the whole bottle of liquid smoke over the meat.
- Seal the foil and refrigerate overnight.
- The next day drain the meat and sprinkle with worcestershire sauce.
- Cover with the foil.
- Bake 6 hours in a 250 degree oven.
- Open foil and pour on the whole bottle of barbecue sauce and bake 1 hour longer.
- let rest for 30 min before serving
Dairy-Free Cornbread (recipe from Whole Foods)
Ingredients
1 1/2 cup yellow cornmeal
1 1/2 cup flour
6 tbsp granulated sugar
1 tbsp baking powder
1/2 tsp baking soda
1 tsp salt
1 1/2 cup plain soy milk or rice milk
2 large eggs
1/2 cup corn oil
Directions
garlic salt
onion salt
celery salt
3 ounces liquid smoke
Worcestershire sauce
1 bottle barbecue sauce
Directions
- Trim fat from brisket.
- Sprinkle meat liberally with all the salts.
- Line a baking pan with enough foil to seal over the meat.
- Put meat on foil lined pan and pour the whole bottle of liquid smoke over the meat.
- Seal the foil and refrigerate overnight.
- The next day drain the meat and sprinkle with worcestershire sauce.
- Cover with the foil.
- Bake 6 hours in a 250 degree oven.
- Open foil and pour on the whole bottle of barbecue sauce and bake 1 hour longer.
- let rest for 30 min before serving
Dairy-Free Cornbread (recipe from Whole Foods)
Ingredients
1 1/2 cup yellow cornmeal
1 1/2 cup flour
6 tbsp granulated sugar
1 tbsp baking powder
1/2 tsp baking soda
1 tsp salt
1 1/2 cup plain soy milk or rice milk
2 large eggs
1/2 cup corn oil
Directions
- Preheat oven to 400°F. Oil a (9-inch) square baking pan and set it aside.
- In a large bowl, whisk together cornmeal, flour, sugar, baking powder, baking soda and salt. In a second large bowl, whisk together soy milk, eggs and oil. Add milk mixture to cornmeal mixture and stir until just combined.
- Pour batter into prepared pan and bake until golden brown and a toothpick inserted in the middle comes out clean, 25 to 30 minutes.
- In a large bowl, whisk together cornmeal, flour, sugar, baking powder, baking soda and salt. In a second large bowl, whisk together soy milk, eggs and oil. Add milk mixture to cornmeal mixture and stir until just combined.
- Pour batter into prepared pan and bake until golden brown and a toothpick inserted in the middle comes out clean, 25 to 30 minutes.
Friday, February 24, 2012
Thai Chicken Noodle Soup
The What's Cooking message board on The Nest does a recipe swap every month, so I decided to join in this month. This month's theme was soup.
I was assigned Slow Cooker Thai Chicken Noodle Soup
This excited me because my husband and I both love Asian food and we're always looking for new things to make in our slow cooker. We keep kosher, so we loved that this uses coconut milk as the base (which is dairy-free and can be combined with the chicken for this dish). A lot of the ingredients were things I hadn't worked with before (fresh ginger, rice noodles, bean sprouts) but thankfully my local ShopRite had all of them (***Note - thin rice noodles are the same as "rice sticks", I learned this from Google after I could only find rice sticks in the Asian food aisle!). I usually use ground ginger in recipes, but I think I may have to start using fresh. It definitely adds to the dish!
I think my biggest challenge was finding time to make this because it involves chicken. I wouldn't want to leave raw chicken just sitting around waiting for the timer on my slow cooker to start, so I had to make this on a weekend. The prep time of peeling, chopping, slicing, etc took about 30 minutes (my knife skills could use some improvement), but nothing was difficult. The one adjustment I made was I didn't put all 2 red bell peppers in. As I was chopping them, it just seemed like so MUCH! Maybe I bought larger ones than the person who came up with the recipe, who knows? I ended up putting maybe one and a half peppers in there. The chicken shredded very easily after the initial 3 hours cooking. Something ended up coming up, so after the last 30 min I had to turn it to warm and head out for a bit, but it was good to go when I returned ready to eat 4 hours later.
I absolutely loved this soup. I'm not a big jalapeno person, but by throwing it into the bowl along with the lime juice it definitely added a nice aftertaste of heat to the soup. And the rice noodles were delicious, too, and made it more filling.
Slow-Cooker Thai Chicken Noodle Soup
Ingredients
3 chicken breast halves
3 or 4 cloves garlic, minced
2 Tbs. freshly minced ginger
2 (13.5 oz) cans coconut milk
4 cups chicken stock
3 Tbs. soy sauce
4 oz thin rice noodles
2 red bell peppers, diced
2 cups fresh beans sprouts
2 jalapenos, finely sliced
2 limes
cilantro for garnish
coarse salt and freshly ground pepper
Directions
- In a slow cooker, add the coconut milk, broth, garlic, ginger, chicken, soy sauce, a pinch of salt and freshly ground pepper. Cook on high for 3 hours.
- Using tongs, remove chicken from pot and shred with two forks. Return to pot. Add the rice noodles, bell pepper and sprouts.
- Cook 30 more minutes. Taste and add more salt and pepper if needed.
- Serve each bowl garnished with sliced jalapeno, a good handful of cilantro and some gigantic squirts of lime.
Labels:
Meat,
slow cooker,
Soup,
Weekend meal
Location:
New Jersey, USA
Subscribe to:
Posts (Atom)